Die-Casting Aluminum Vs. Extrusion Aluminum Vs. Stamping Aluminum for LED Light Heatsink
1631Die-Casting Aluminum Vs. Extrusion Aluminum Vs. Stamping Aluminum for LED Light Heatsink
View detailsSearch Power / LED Chip / Power Supply / Price
In my experience with this brand, it only took 10 minutes to read through and understand the process. Then another 10 minutes to install it for the first time. The next installations only took 5 to 7 minutes for each street light.
So for 10 street lights and, say, a pole distance of 35 meters each, it would only take maybe 2 hours to finish the installation process, if you’re a one-man army. Of course, installation time is lesser if there are two or more installers.
And you won’t need any engineering background, by the way. There’s no wiring and circuitry process in solar street light products as they are all pre-wired in the LED fixture. Not unless you want to wire things on your own, you can refer to “Make a Smart Solar Powered Street Lamp” blog.
At the end of the day, you’ll feel heroic if you were able to install a street light by yourself. So read on to know how you can do it yourself.
Unboxing let’s first find out what’s inside the box. Inside its packaging, you’ll find the following:
Unit main body or the solar light assembly
Bent pipe (for Angel Eye); connection pieces.
Anchor fixtures (A and B) – these are properly labeled
Some M8 screws depending on the model (M8x100, M8x50, M8x60, M8x15)
Tools such as Φ6mm Allen key; Φ4mm Allen key; Φ2mm Allen key; open spanner
User manual
Remote control (for Solar Street Light model )
How to Install an A Series All-in-One Solar Street Light?
The A series is a swivel model all-in-one street light. It has an ultra slim figure and a modular design perfect for solar landscape lighting and courtyard lighting. carries this design with an available range from 15W to 80W.
Installation time: 5 minutes
5 Simple Steps:
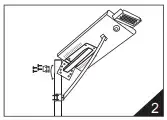
Steps
illustration
1. Simply connect one end of the bent pipe to the main body unit and another end with the ‘Anchor ear B’ using M8x50 screw and M8x50 screw respectively.
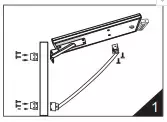
2. Next is to secure the anchor ear B to its base with 4pcs M8x100 screws as shown in the diagram.
3. Secure the Anchor ear B to the Anchor ear A using 4pcs of M8x100 screws.
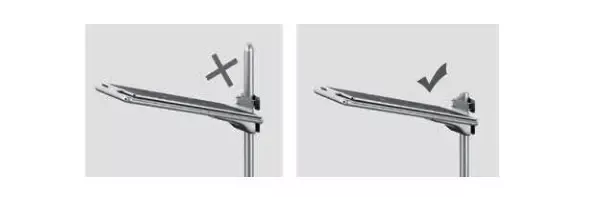
4. Place the lamp head onto the pole and secure with screws. Make sure that the LED source is vertically aligned with pole or set it at the desired direction.
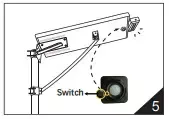
5. At the bottom of the lamp is a switch for the microwave sensor. Press it once the installation is finished. The LED lamp will then light after 1 min delay and will turn off automatically when not needed.
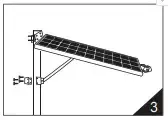
Before you install your first All-in-One Solar Street Light, make sure to follow these tips so you won’t have a problem with its operation.
As the solar panel is a fixed component, make sure that when you install the solar street light, the solar panel direction faces the direction of the sun at its highest peak. This is at around 12:00 nn to 2:00 pm.
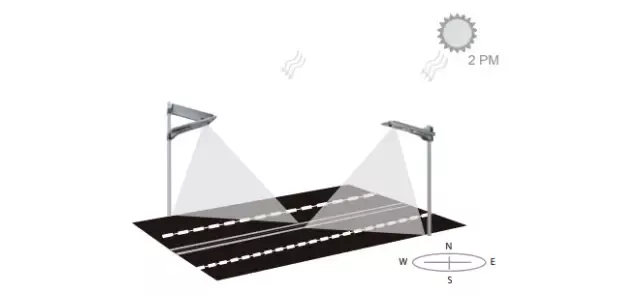
During these hours, the sun’s intensity is very high and your solar panel can receive as much energy as it can. To make your solar street light work more efficiently, be sure to set the direction of the panel in such a way that that it faces the sun at 2pm.
This is to maximize the efficiency of your solar panel and so that the battery can be fully charged.
Again, this is to ensure that the panel does not get any shadow from any object including the pole.
①“All in One solar street light” could not work without sunshine, please select the suitable model according to the local sunshine radiation and the annual total radiation.We suggest use the both AC and DC charging model in those places where lack of sunshine or have long-time rainy days.
②“All in One solar street light” adopts the long life Lithium battery for storing energy, charging temperature at day time is between: 0°C~+60°C,when temperature goes lower than 0°C ,the control system will stop automatically to protect the battery, and it will revive to charge the battery while temperature goes higher than 0°C. Discharging temperature at night is between: -20°C~+60°C, any ambient beyond will take damage to the battery. So please check these factors while selecting the street light.
③Battery of the “All in One solar street light” can be stored for 6 months long after fully charged. Therefore please examine and charge it periodically after long time transportation or storage to prevent damaging.
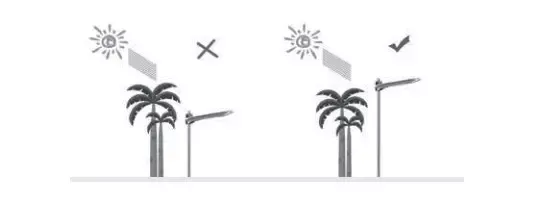
④When install the lights in Northern Hemisphere, please adjust the solar panel to the South as much as possible to collect maximum sunshine radiation, while install them in Southern Hemisphere, By the same token, keep solar panel to north. At the same time please keep it away from any shadow of houses, trees etc.
⑤Keep clear of the surface of the All in One solar street light with normal detergent to get maximum power generation, clear the dust or tree leaves or any grease.
⑥All in one solar street light have got the standard of IP65.The vents on the surface is designed for radiating.The materials are made of aluminum alloy which can survive in the environment of seaside and desert.
⑦The knob of the fuse is at the left rear end of the light, please insert the fuse while using.By the way,there is one piece of fuse more as backup.(If not fuse,then it is switch,just turn on the switch)
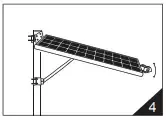
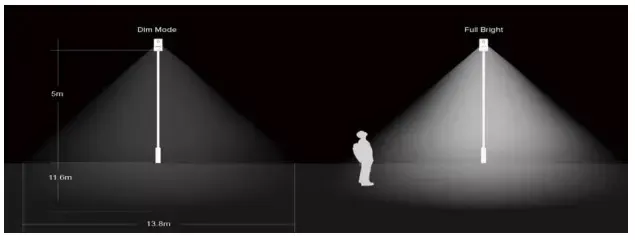
After you install your all-in-one solar street light, it should be able to automatically switch on at dusk and switch off at dawn. It must also work automatically from dim to full brightness, depending on your specified time schedule profile setting.
For its original factory setting, the solar street light would automatically dim or decrease its intensity to 30% of its full brightness when it does not detect any passerby.
What an all-in-one solar street light is, is really an amazing innovation of the traditional solar street light. It’s easy to install, requiring less of your time and energy. I hope this blog has cleared some cloud of confusion on how to install all-in-one street lights.
If you want to buy affordable all-in-one solar street lights with high-quality parts, you might want to read “How Much Does an All-in-One Solar Street Light Cost” first before you find your supplier. This blog is on how All-in-One Solar Street lights can be really affordable when you pick the right manufacturer/supplier.

Die-Casting Aluminum Vs. Extrusion Aluminum Vs. Stamping Aluminum for LED Light Heatsink
View details
MEANWELL XLG Series Constant Power Mode LED Driver(Power Supply) for Street Lamp
View details
E Series Linear IC Driver DOB Highbay Light, Square Luminous with Looped Optical Lens.
View details
SKD for Solar Street Lights; What is Solar Street Light Parts?
View details

HelloPlease log in